
As soon as you've decided to get yourself a car, it is time to start looking around, the web has a lot of nice places to find Porsche 356's for sale, you should also try the 356 registry, be a member and get the bi-monthly hagazine with a lot of right priced cars, some bummer of course as always. I will include one starting point for your web search, from here you will find good links to other places;
I would consider joining the 356 registry a must, you should also check the advertising sections in Panorama and Excellence. There are German magazines too, but for the moment the prices in Germany are not such that it is cost effective to import cars from Europe.
The 356's rust, they rust a lot, there are a few reasons to this; -no rust proofing, -the chance of condensation in the heat channels in the longitudinal, -tight coupe is also very good in trapping and keeping moisture.
When you have come far enough to decide go seeing a car, never trust the sellers description. You must have to see for yourself. Sometimes the cars are ugly restored and a novice seller can easily believe the car is better than what is.
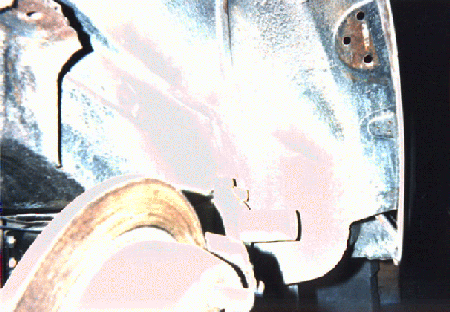
When inspecting a car start with the longitudinals, "which longitudinals you say". These are very rust prone and most often need replacement. Is there a jack receiver attached to the longitudinal? It is a boxy piece located about 1/3 from the rear of the longitudinal. The longitudinals rust all over, mostly where they are attached to the inner longitudinal (floor perimeter), but also in the front and rear.
Picture 11; The longitudinal with reiforcements.
From the longitudinal go forward to the panel 'closing' it. This will be the panel that make up the rear of the front wheelhouse. This panel is often rusty in the lower areas. If you find rust in the upper area, this will be much harder to deal with unless you are preparing to remove the front fenders. There is also another panel, half of it behind the closing panel, the other half close to the inner wing. this panel is straight sheet metal with a little bend in one edge. This panel is definitely a panel you will make yourself as it only involves a metal-scissor and a piece of sheet metal to make it. This panel should not be rusty toward the inner wing (chassi). If it is we will have to make a lot more panels or repair pieces ourselves, but it is up to you whether you are ready for total rebuilding the chassis or not. Everything can be done, just start with the easy and learn on the way. But initially a car with such rust should be avoided, chances are there is a lot of rust other places too!
Then switch to the rear wheelhouse. The rear closing panel is closing the longitudinal, and is located in the front of the rear wheelhouse. These are rather cheap and also easy to fabricate, don't be put off if these show signs of having seen better days. But, you will also see where the heater tube enters the longitudinal channel, this areas condition is much more important as this is a part of the chassi structure. Check the channel from the heater tube inlet and rearwards to the engine bay. This is not the easiest part to replace, but the job is not easy. Even if it seems the area where the torsion bar is located has need for rebuilld, don't call it off yet. These repair parts is now available from Germany.(actually US available now!) Be aware of rust in the chassi.
Picture 12b; Another picture of the rear wheelhouse.
Inner rear wing towards the passenger compartment can often be rusty, if you are not able to decide upon looking just from the outside, remove the rear interior side panels and inspect. Rusty? These are easy to refabricate, all you need is someone with a metal step roller, cut a piece, roll in the steps at the correct places, hit it against the sand bag, replace.
The door post should then be inspected, this is a problem as the wheel sprays dirt and water onto this panel and moisture gets in between the doorpost and rear inner wing. Check it from both the inside and outside. These are also available manufactured, but shouldn't be the first part to change in your rebuilld. I would recommend doing all the 'visible' outer panel work at the end of you restoration as you then will have gained experience, and will be able to better 'see' the right way to do it at once.
Then it is the front of the rear fender, this will often reveal plastic filler and such nasties, check it out and remember these are available as repair sections and are pretty easy to put right. You will have to be careful to get it nice and check door gaps very often though!
Let us get back to the front wheelhouse. Now it is time to check out the condition of the torsion tubes outer parts. Check the condition and see whether these are rust attacked, look at the panel areas where the tie rods go through. If these are rusty, you will have to be able to remanufacture or patch it yourself as these parts are not available. In the bottom you will find a frame strut, and yes, this one is available. That is a good thing as it also often is rusty. Move up to the inner wing itself, check the condition and remember these parts are not available, but possible to make and very difficult to fit.
Now you will have to check the battery box sides, especially in the lower area, how is the mount for the bumper?
Assume you're still intersted. Open the hood, remove the spare wheel, check out the condition of the battery box. The floor itself isn't too bad to replace, but if it gone both in the front and rear and the whole perimeter is rusty, it will be a tricky job. But if you are prepared for it, you will make it. When hood is open, check the inner wings again from the inside, look for 'bubbles' in the insulstion material. If you find something peculiar, push on it, if it sound like your breakfast flakes, it is rust inside. On pre T-6 cars remove the fuel tank and inspect the tank floor. Good, bad or ugly? These are available remanufactured and shouldn't be a problem to replace, but it is an expensive part. How does it look under that rubber mat in front of the fuel tank. No $50 rubber mat? Ok, it is perhaps not rusty there either. If it is, it is an easy place to repair. Unscrew the cover and look down and around the steering box area. Notice the inside part of the frame struts in the front wheelwells. How is the big V shaped thing down there? The V shaped thing, the K-member as it is named, or the diagonal-member is rather easy to replace, and wont cost you the bank. But be aware of it.
Now it is time to get under the car. how is the floor where it attaches to the longitudinal? This is THE rust spot, this is where the fun often start and spreads to the whole area. The whole perimeter of the floor should be checked; front, both sides and rear. Okay, so you'll need a new floor. No problem, parts availability is good. This is the job you were expecting. Right?
Picture 14a; The floor perimeter etc.
Picture 14a; .more floor perimeter etc.
Picture 14a; ..last floor perimeter etc.
As you check the front perimeter of the floor, how is the lower parts of the toeboard panel? This is a rust prone, tricky and expensive place to work. If it is gone more than 4 inches up, you will need the $150 repair panel. If the rust is below the height of the brake master cylinder you will be able to make the patch panels yourself. This is a dirty job, but as I managed to replace it, you will also be able to this.
Back to the rear perimeter of the floor. Check out the condition of the torsion bars and the panels under the rear seats. Torsion bar area rust is difficult, but rust in the seat panels etc are rather easy as soon as you get going.
Lift the floor carpet and look at the inner longitudinal. Will you need to replace the lower 2 inches? How about the heater outlet? That is more tricky than the otherwise straight parts.
Picture 15; Inner logitudinal.
Remove the toeboard panels. Check the condition of the floor and structure inside this area. You would perhaps find rust both in the area towards the wheelhouses and in the front. These part are 'make it yourself', but as they are not visible, you can trust you will be able to do them. :-)
Let us check the condition of the engine bay. Check the sound deadening for bubbles. If you find these, much chance there is rust towards the rear inner wings. Look for rust in the sharp edges around the area the hood settles to. My experience show the engine bay often is rather good on these cars.
Having checked the structural parts of the car, let us move towards the outer body panels. Time to check the doors, how is the lower parts of the door? These are possible to get as repair panels, but is a bit difficult to make look pretty. Look inside and under the doors. hopefully these are good. You should also check the hinges and the area around them for cracks.
As decribed earlier look at the front of the rear wings and rear of the front wings. Then it is time for the front clip, how is it around the headlights, the flashers and the grilles? The T-6 clip is available at reasonable price. the T-5 and A clip is very expensive items.
Check out the front and rear hoods, look at the mounting point of the lock mechanism and the inforcement channels of the front hood. The rear hood the same way. Used hoods are easily available and shouldn't scare you off.
Picture 16c; Outer body panels.
Picture 16d; Outer body panels.
Move to the outer sills, these are not difficult to get as these are manufactured by different sources. But these are rather expensive. how is their overall condition, under the rubber mat, in towards the front wheelhouse, against the lockpost? Look at the lockpost from the under the rear inner wing, especially the lowest part of it.
The rear clip is expensive and should be good. Look around the area of the rear lights. Look up inside the rear clip from above. Hopefully this part is good.
If you still believe you will manage to restore the inspected car, you should now know what you are going to. Perhaps the seller discovered places of rust he didn't know existed too. Reasonable prices are difficult to state, but the most of the 356 objects available is condition 4-5 cars and should be priced accordingly.
If the job seem to big, you hopefully discovered it and move towards the next object you can find without burnt fingertips.
The '58 coupe had severe rust in the floor, having had amateur repair it begged for new floor, longitudinals, repair of the inner longitudinal, heater tube inside it, the reinfircements, jack receivers, front and rear closing panels. It also needed new repair parts for the front toeboard, new k-member, frame struts, repair to the front inner wings, repair to the torsion tube outer parts, repair to the battery box walls all sides, new battery box floor, new tank floor, repair to rear inner wings, remanufacture of floor tunnel, and some more. This job grew on me, and I am happy I decided to go through it. Never more shall I fear any chassi rebuilld!
The '59 coupe needed new front floor half, replacing left longitudinal with the reinfircement and the heater tube, a new complete front closing panel, repait to the other one, new rear closing panels, repair to the toeboard lower 2 inches, new right inner wing, small repairs to the frame struts and outer torsion bar part, new K-member, new front clip and front fenders. The '59 looked much more difficult at the first, but boy were I wrong!


